ANTs
Intro
ANTs stands for Advanced Normalization Tools
I think the main website is here: http://stnava.github.io/ANTs/
Documentation: http://stnava.github.io/ANTsDoc/
"Originally, the ANTs framework provided open-source functionality for deformable image registration with small or large deformations,"
"ANTs has since grown to include N4 bias correction, additional evaluation of multiple modalities and organ systems, univariate or multivariate image segmentation, tighter integration with the Insight ToolKit, a well-evaluated cortical thickness pipeline and, more recently, visualization tools and integration with R"
"The most important core C++-based ANTs programs are: antsRegistration, antsApplyTransforms, Atropos for segmentation, N4BiasFieldCorrection for inhomogeneity correction, KellyKapowski for estimating thickness, ImageMath image processing utilities and, finally, sccan for sparse dimensionality reduction."
Install
Build ANTs from source code [Linux / Mac OS]:
https://github.com/stnava/ANTs/wiki/Compiling-ANTs-on-Linux-and-Mac-OS
[Windows]:
https://github.com/stnava/ANTs/wiki/Compiling-ANTs-on-Windows-10
Mac install detail
The following worked on Version 10.15
- Install XCode simply by going to app store
- Check if you have git (should come with Xcode command line tools), 'git —version' Install otherwise.
- Check if you have cmake 'cmake —version'. Install otherwise.
Follow 'SuperBuild quick reference' line by line.
Once completed it is time to add the paths.
After the SuperBuild quick reference has installed I had 3 new files ~/ANTs, ~/build and ~/install
- Copy the ~/install file into ~/ANTs
- Add all the files in ~/ANTs/Scripts into ~/ANTs/install/bin 'skip' or 'replace' duplicates, it does not matter
- cd into your home directory 'cd'
- check for hidden files 'ls -la'
- I edited .bash_profile but you may have to edit .profile
- 'sudo nano .bash_profile' put your password in
- Add the following lines underneath everything already in the file (changing 'johanndrayne' to your username)
export PATH=/Users/johanndrayne/ANTs/install/bin/:$PATH
export PATH=/Users/johanndrayne/ANTs/Scripts/:$PATH
export ANTSPATH=/Users/johanndrayne/ANTs/install/bin/- Save and quit, then close all terminal windows and open a new one.
- Check 'which antsRegistration' should output something similar /Users/johanndrayne/ANTs/install/bin//antsRegistration
- Check 'antsRegistrationSyN.sh' should provide information about the function
If this did not work, consider consulting the following links
Greydon Gilmore Installation walkthrough
Quick SyN
If you want a decent, fast registration you might run something like this:
antsRegistrationSyNQuick.sh -d 3 -f fixedimage.nii.gz -m movingimage.nii.gz -o prefixwhere -o represents the output prefix for the filename
The -d option denotes image dimensionality,
-f option denotes the “fixed” image
and the -m option denotes the “moving” image. The moving image will be deformed to match the fixed image.
Output is determined by -o where the output will be named with prefix=outputEx1.sh (the word output concatenated with the name of the Example 1 script) and include a prefix0GenericAffine.mat (the low-dimensional affine transform which may be inverted numerically), the prefix1Warp.nii.gz (the diffeomorphic transformation pulling the affine transformed moving image toward the fixed image), and the prefix1InverseWarp.nii.gz (the inverse diffeomorphic transformation pulling the fixed image toward the affine transformed moving image).
Examples
Forums for Help
Main Functions
- N4BiasFieldCorrection
- antsRegistration
- antsMultivariateTemplateConstruction2.sh
- antsApplyTransforms
- antsBrainExtraction.sh
- ImageMath
When specifying files in ANTs functions, unlike FSL, ANTs wants the extension e.g.ANTs = subject-001.nii.gz || FSL = subject-001
N4BiasFieldCorrection
N4 is a variant of the popular N3 (nonparameteric nonuniform normalization) retrospective bias correction algorithm. Widely seen as an improvement to N3. It is almost always advisable to run N4 correction before registration.
A simple run using default options, which is normally good enough.
N4BiasFieldCorrection -d 3 -i ${input} -o ${output}antsRegistration
I will provide a rough call, but look here for an anatomy of an antsRegistration call.
Tips for registration:
- Run a bias correction before antsRegistration (i.e. N4).
- Remove the skull before antsRegistration.
- Never register a lesioned brain with a healthy brain without a proper mask.
- Register a low resolution image onto a high resolution image, look at antsApplyTransforms if you need to register a high to low resolution image
antsRegistration --dimensionality 3 --float 0 \
        --output [./input_to_ref_,./input_to_ref_Warped.nii.gz] \
        --interpolation Linear \
        --winsorize-image-intensities [0.005,0.995] \
        --use-histogram-matching 0 \
        --initial-moving-transform [$fixed,$moving,1] \

        --transform Rigid[0.1] \
        --metric MI[$fixed,$moving,1,32,Regular,0.25] \
        --convergence [1000x500x250x100,1e-6,10] \
        --shrink-factors 8x4x2x1 \
        --smoothing-sigmas 3x2x1x0vox \

        --transform Affine[0.1] \
        --metric MI[$fixed,$moving,1,32,Regular,0.25] \
        --convergence [1000x500x250x100,1e-6,10] \
        --shrink-factors 8x4x2x1 \
        --smoothing-sigmas 3x2x1x0vox \

        --transform SyN[0.1,3,0] \
        --metric CC[$fixed,$moving,1,4] \
        --convergence [100x70x50x20,1e-6,10] \
        --shrink-factors 8x4x2x1 \
--smoothing-sigmas 3x2x1x0voxRemove the spaces if using the above code. I used them to highlight the 3 registration differences.
- Rigid = Translation + Rotation
- Affine = Translation + Rotation + Shearing + Scaling
- SyN = Diffeomorphism (non-linear)
antsMultivariateTemplateConstruction2.sh
You need to create a folder with all the scans you want to create a template out of
${ANTSPATH}/antsMultivariateTemplateConstruction2.sh \
  -d 3 \
  -a 1 \
  -o ${outputPath} \
  -i 5 \
  -g 0.25 \
  -j 16 \
  -c 0 \
  -k 1 \
  -w 1 \
  -n 1 \
  -r 1 \
  -l 1 \
  -m CC \
  -t SyN \
  -y 0 \
  -z ${referenceT1} \
${tempDirectory}*my ${tempDirectory} directory ended in a /
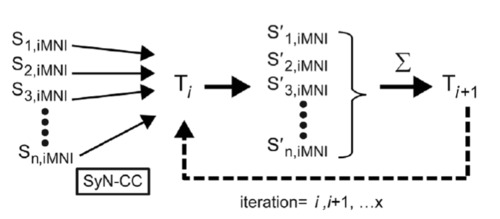
The below is an illustration of how the template construction works.
- The images are averaged or an initial reference is specified.
- Each image is registered to this reference.
- A new reference is created by averaging these registered images
- Using the registered images and new reference repeat steps 3-4 for a total of i iterations
Useful flags
- o: You don't need to end the path with '/'
- i: From above, number of images to reference iterations
- j: number of CPU cores
- c: control for parallel computation
- k: number of modalities (i.e. just T2 image or T2 WM and GM)
- n: N4BiasField Correction of moving image
- r: rigid body registration before creating initial template
- y: rigid (translation & rotation) not used when y=0 with affine transform
- z: useful if input images are at different FOV
antsApplyTransforms
I will provide a rough idea of this function, but look here for a much more detailed overview.
As mentioned in antsRegistration it is advised to register a low resolution image onto a high resolution image. But if you need a high resolution image in the low resolution images space.
- Register the low resolution image to the high resolution image
- Apply the inverse warp to the high resolution image
e.g Applying the inverse warp to register the fixed image to the moving images original space.
${ANTSPATH}antsApplyTransforms \
  -d 3 \
  -i fixedImage.nii.gz \
  -r movingImage.nii.gz \

  -t [movingToFixed_0GenericAffine.mat, 1] \

  -t movingToFixed_1InverseWarp.nii.gz \
-o fixedToMovingDeformed.nii.gz- i: input
- r: reference image
- t: transform file, note differences in order in above link
- o: output
Using H5
In fmriprep or qsiprep, you may notice that the transforms are saved as h5 files
These h5 files are actually composite transforms comprising of an affine and a displacement field transform (non-affine)
Here is an example of using ANTs with h5 to perform a transform:
antsApplyTransforms -d 3 --verbose 1 -i sub-AMW01_desc-preproc_T1w.nii.gz -o T1-to-MNI.nii.gz -r sub-AMW01_space-MNI152NLin2009cAsym_desc-preproc_T1w.nii.gz -t sub-AMW01_from-T1w_to-MNI152NLin2009cAsym_mode-image_xfm.h5to apply using a 4d to a 3d, use the -e flag:
-e, —input-image-type 0/1/2/3/4/5
scalar/vector/tensor/time-series/multichannel/five-dimensional
Option specifying the input image type of scalar (default), vector, tensor, time
series, or multi-channel. A time series image is a scalar image defined by an
additional dimension for the time component whereas a multi-channel image is a
vector image with only spatial dimensions. Five-dimensionalimages are e.g., AFNI
stats image.
<VALUES>: 0
antsApplyTransforms -d 3 -e 3 --verbose 1 -i sub-AMW01_dir-AP_space-T1w_desc-preproc_dwi.nii.gz -o DTI-to-MNI.nii.gz -r ../anat/sub-AMW01_space-MNI152NLin2009cAsym_desc-preproc_T1w.nii.gz -t ../anat/sub-AMW01_from-T1w_to-MNI152NLin2009cAsym_mode-image_xfm.h5